Google Forms Tips and Tricks
1] Add collaborators
Suppose, you are two or three people, who want to host an event using Google Forms, then it would be quite time-consuming if you edited the form one by one. Instead of that, you can simply add other people to your form and let them edit at the same time. Also, you should know that more than one person cannot edit the same thing at a time. Obviously, Google Forms will save the latest one. Therefore, you should divide your work before opening the form. Otherwise, there will be a conflict. To add a collaborator, click on the three-dotted button that is visible on your top right corner after opening a form and select Add Collaborators.
Now, you can enter the name or email address of your collaborator. You can also include a message with the notification so that the recipient can understand everything.
2] Limit to 1 response per person
Let’s assume that you have organized a contest using Google Forms or hosted something using the same. At such times, any person can respond to the Google form as many times as he/she wants. To get rid of this problem here is a simple trick. You can restrict everyone from entering multiple responses. This will require the Google account sign in. Otherwise, the form will not be able to detect the same person. The form will be closed for him/her when he/she enters his/her response. However, it has a drawback. If someone has more than one Google account, he/she can response multiple time. However, that will be less spamming than without this option. To limit to 1 response per person, create a Google Form and click on Settings. Here, you will get an option called Limit to 1 response.
Just make a tick mark in the respective box and click on Save.
3] Allow respondents to edit after submit
Suppose, you have organized something where it doesn’t matter if someone edits his/her message even after submitting it. At such a point, you can use this trick to let respondents edit even after submitting the response. It doesn’t require any Google sign-in, which means, anyone, who has submitted a response, can easily edit the message. To provide such an option, create a new form and go to Settings. Under the General tab, you can use the option Edit after submit.
Just enable this option by making a tick in the checkbox.
4] Select existing spreadsheet to collect answer
Whenever you use a Google Form to collect something, it will use a Spreadsheet (Google Spreadsheet) to collect all the answers/entries or whatever you have asked for. Every new form will use a new spreadsheet to collect the data. But, suppose, you opened something a few weeks ago, where you have got some responses, and now you want to do the same again. At such a time, if you want to use the existing spreadsheet to collect answers or data, you may have to follow this trick. So first, create a new form. While creating the form, you will get two tabs i.e. QUESTIONS and RESPONSES. Switch to RESPONSES tab. Here, you can find a spreadsheet button on your screen. After that, you can choose whether you want to create a new spreadsheet or select an existing spreadsheet.
Select the second option and choose the spreadsheet that you want to use.
5] Change confirmation message
Let’s assume that you have created a form to recruit some people. Therefore, you should let the respondents know when you will reply to them. You can add the date in the confirmation message. By default, the confirmation message is. Your response has been recorded. To change it, open a form and go to Settings. In the PRESENTATION tab, you can find the option to change the confirmation message.
You can write anything in this field. However, try to keep it small and meaningful.
6] Send email confirmation to respondents
This is a new way to connect with the respondents. You can send an email confirmation to respondents, which means, the submitter will get an email after submitting the form. Nevertheless, there is no inbuilt option. You have to install an add-on called Email Notifications for Forms. Download it from here for your Chrome browser.
7] Get email notifications for new responses
The trick above will let you send an email confirmation to the respondents that you have got his/her submission. However, this trick will assist you (or the form owner) to get an email notification whenever someone submits a form. To enable email notification, create a new form and go to RESPONSES tab. Now, click on the three-dotted button and select Get email notifications for new responses.
That’s it!
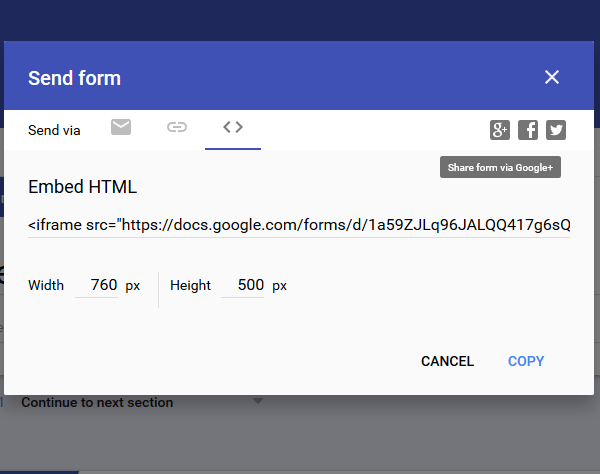
8] Embed form on web page
Do you want to embed Google Form on a web page? This trick is for you. With the help of this trick, you would be able to show any form on any web page but make sure the web page is built with HTML. Other than HTML, you must know what you are doing as this will use IFRAME to display the form. However, at first, create the form and click on Send button. Following that, you will get the Embed option. Just select the desired size and paste the code on the web page.
It should display the form right away. Previously, Google Forms had more options and more importantly, it had regular expressions and conditions. However, these have been dropped in the latest update. Now take a look at these Google Sites tips and tricks to design a better website.